Tuesday, September 13, 2011

Fit Me Maybelline Foundation Review

I am well overdue for this review but I wanted to finish the bottle before I reviewed it. 

The Promise

This foundation does not have a new concept. It is the same as all of the other makeups that promise to blend perfectly into your skin. The only difference between this makeup and the others is the others will cover your blemishes and this one will not. It promises to make you look great without hiding your skin.

The delivery

Being a woman of color I have an issue with my skin known as hyperpigmentation. It means that when a blemish appears on my skin it leaves behind a black mark, dark brown marks on lighter skinned women of color. Fit Me does not cover these blemishes but it does make them less noticeable. It finds the balance between the highs and lows in the color of your skin. So you aren't being covered up but your skin tone is being evened out. If you have decent skin with the occasional hiccup then this foundation is for you. It makes you look naturally beautiful. My husband couldn't tell that I was wearing makeup until he noticed my eyeshadow. 

It matches my skin perfectly. I am a 320, Honey Beige and it matched my skin when I bought right before summer and it matched my skin in the dead of summer.  It's light enough to wear daily and all year.

Recommendations

Use a sponge to apply it not your fingers or a foundation brush. Use natural light to see if you have applied it evenly. Apply more foundation for a smoother look. Don't use heave eyeshadow colors with this look because it will look like you made up your eyes and nothing else.

Cost

It was $7.59 a bottle at RiteAid without the sale. That price was the average price of the foundation at Target and at Walgreens. I recommend looking online at Walgreens, RiteAid, and  Target at the same time to see which one has it on sale. It's usually on sale for $4.59 a bottle. If it's not on sale at one store it will be at the other. I would not buy this item when it is not on sale.

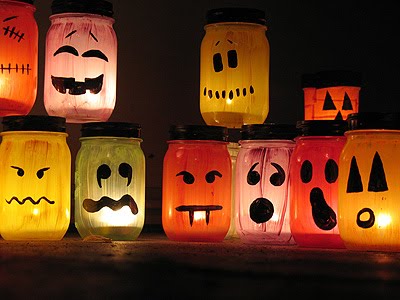
Halloween Jars

I know that it is too early for Halloween but it's one of my favorite holidays and I like to prepare early. One of my annual crafts are Halloween jars. There are many different versions and uses for this craft making it the perfect family craft. 


Halloween Ghosts

You will need mason, sauce, or condiment jars and acrylic paint with brushes. You will also need tea light candles or a line of white, green or orange lights (Christmas lights).

Carefully peel the label off of the jars making the stickiest part the back of the jar. Paint your jar completely on the outside whatever color you want. If it's a ghost paint it white. If it's Frankenstein paint it green. Make sure the layer of paint is thin enough for the light to show through. I like to light the candle first and drop into the jar before I paint so I can see if the light shines through. Leave the lid off. 

Icky Jars

You will need green jello, hard boiled eggs, gummy worms or spaghetti and vienna sausage. Paint is optional.

This is a game I played when I went to Halloween parties when I was younger. Fill the jars with jello and drop an egg in one, worms in the other, and 3 to 5 sausages in the other. If your haunted house is dark then you won't need to wrap or paint the jars. Have each kid stick their hand in the jar with their eyes closed and have them guess what's in it or tell them what you want them to believe is in it. The egg is the eyeball, the sausage is the finger etc. 


Wiccan Herbal Gift
Halloween is New Years to the Wiccans of the world. Give them the gift of the harvest or new beginnings. Halloween is a harvest holiday. You can fill the jars with harvested herbs like Mandrake for healing, chamomile for relaxation, basil for success etc. Be sure to label them. If you want to give the gift of new beginnings plant herb seeds in the jars with soil and label them. They will have their own herb garden.

Monday, September 5, 2011

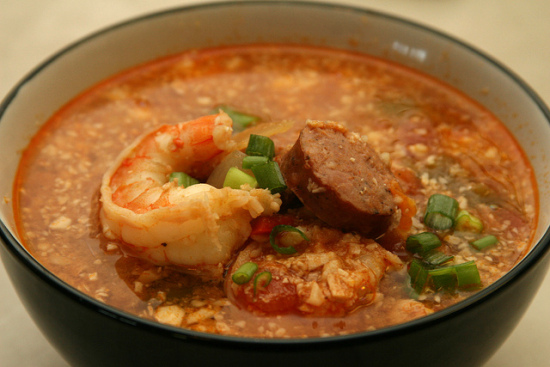
Jambalaya Recipe

The base of this recipe is the jambalaya recipe from Better Homes and Garden. It's the big cookbook that looks like a picnic blanket. My book has the recipe on page 498. My husband loved the recipe but my son couldn't get passed the spicy sausage or the red pepper flakes. Now I have a 12 month old daughter who likes to eat off of my plate. Spice is a no no, at least for now. Here is the recipe with my alterations noted.


Jambalaya

Makes: about 7 cups (6 main-dish servings)
Prep: 25 minutes Cook: 20 minutes
 
Ingredients
  • 1pound fresh or frozen peeled and deveined shrimp
  • 1/2 cup chopped onion (1 medium)
  • 1/3 cup chopped celery
  • 1/4 cup chopped green sweet pepper
  • 2 cloves garlic, minced
  • 2 tablespoons cooking oil
  • 2 cups chicken broth
  • 1 14-1/2-ounce can diced tomatoes, undrained
  • 8 ounces andouille or kielbasa sausage, halved lengthwise and cut into 1/2-inch slices
  • 3/4cup uncooked long grain rice
  • 1 teaspoon dried thyme, crushed
  • 1/2teaspoon dried basil, crushed
  • 1/4 teaspoon black pepper
  • 1/4 teaspoon ground red pepper
  • 1 bay leaf
  • 1 cup cubed cooked ham
Alterations: My onion was the size of a small, bagged apple. I used 3 stalks of celery with the white end cut off. I used one whole green pepper the same size as the onion with the white membrane removed. I used extra virgin olive oil to cook with and freshly chopped tomatoes. I used mild links for the sausage and instant long grain rice. I completely omitted the ground red pepper. 
 
Directions 1. Thaw shrimp, if frozen. Set shrimp aside. In a 12-inch skillet cook onion, celery, sweet pepper, and garlic in hot oil until tender. Stir in chicken broth, undrained tomatoes, sausage, rice, thyme, basil, black pepper, red pepper, and bay leaf. Bring to boiling; reduce heat. Simmer, covered, for 15 minutes.

2. Stir in shrimp. Return to boiling. Simmer, covered, about 5 minutes more or until shrimp turn opaque and rice is tender. Stir in ham; heat through. Discard bay leaf. Makes about 7 cups (6 main-dish servings).
nutrition facts
  • Servings Per Recipe about 7 cups (6 main-dish servings)
  • Calories416
  • Total Fat (g)20
  • Saturated Fat (g)6,
  • Monounsaturated Fat (g)9,
  • Polyunsaturated Fat (g)4,
  • Cholesterol (mg)154,
  • Sodium (mg)1199,
  • Carbohydrate (g)27,
  • Total Sugar (g)4,
  • Fiber (g)1,
  • Protein (g)30,
  • Vitamin A (DV%)0,
  • Vitamin C (DV%)29,
  • Calcium (DV%)9,
  • Iron (DV%)22,
  • Starch (d.e.)1.5,
  • Vegetables (d.e.)1,
  • Medium-fat Meat (d.e.)3.5,
  • Percent Daily Values are based on a 2,000 calorie diet


Thursday, September 1, 2011

Back To School Night: 10 Questions You Should Ask

Back to school night typically occurs twice in any given school year. The first is usually during the first three months of school. The point of back to school night is to brag about the amenities of the school as well as the qualifications of the teachers. The children are able to show what they have done so far and parents are able to ask any questions about their child's development that weren't addressed before. With all of the activities that go on during this school function, it's easy to lose track of what you really want or should know about your child's school and education. Here are ten questions you should ask to get you started. You will find it easy to add to it as you consider your specific situation. 

1. What are the teacher's credentials?

2. What is her teaching style?

3. What is the teacher's lesson plan for the quarter, semester, year?

4. What assignments and subjects are the most challenging / easy for your child and why?

5. What methods of discipline does the teacher use?

6. What is the best way to support her learning plan?

7. Which children does your child get along with best / worst?

8. How would the teacher describe your child's personality and behavior?

9. What ranking does your school have in the No Child Left Behind testing?

10. What is being done to effect that ranking?

Saturday, August 27, 2011

Back To School Behavioral Guide For Elementary School


By now your child is either back in school or on his way to school. There are a slew of new kindergartners and 1st graders that are coming from some sort of daycare or preschool. If you have always been a working mom before now you and your child will be hopelessly conformed to the ways of your daycare provider. But now that your child is in elementary school, things are definitely different. If your child is entering elementary school or switching to a new elementary school this guide is for you.

Attendance- Daycare and preschools aren't sticklers for time unless you are late picking up your child. At elementary school, it is mandatory to drop off and pick up your child on time. If you leave your child on school grounds there is no guarantee that he will be supervised until you break through traffic. If your child is late, there is no late fee. You are negatively impacting his education and disrupting the education process of the other students in class. Be on time. Rearrange your schedule if necessary.

Dress code- At preschool and daycare it was a matter of safety. No sandals, or socks must be worn at all times, or no jewelry. At elementary school there is an actual dress code. No shorts after the last Friday in October, or something else to that effect. When you register your child for school there will be information available in the front office on the dress code. Make sure you acquire this document before you go back to school shopping.

Diet- In preschool you can give specifics about what and when your child eats a meal. But this is elementary school. Your child's teacher will walk your child to the lunch room and divide the hot lunchers from the brown baggers to ensure everyone is receiving lunch. Then, they take their own lunches. Don't bother your child's teacher with anything other than a food allergy. Your teacher will not be available to monitor sugar intake or lunch box temperature. You will need to take care of this on your own. Don't stress over the nutrition of the food offered at school. If you give your child a healthy breakfast and a healthy dinner and after school snack, that one unhealthy lunch won't harm them.

Homework- Your child won't be used to having homework. Make sure that when you meet your child's teacher to ask about the delivery of homework assignments. You don't want to find out after the fact that you were supposed to be reading a board on the classroom wall for the assignment instead of looking in your child's backpack. Don't count on your child to remember he has homework.

Bus stops- It's so easy to feel that your child is safe because there are other parents at the bus stop as well as other children. But consider this, if someone snatches your child, do you really expect a stranger to leave his child behind to chase down your own? Stay at the bus stop with your child until they are 13 or older. They may not like it, but most bus stop kidnappings are of elementary and middle school children. The more parents standing at a bus stop in the morning the less likely a kidnapping or assault will be.

Lefty- Make sure to tell your child's teacher that you want him to stay left handed before his first class. Most teachers will work with you. Help your teacher out by reinforcing the left hand at home with worksheets.

For more back to school tips, contact TheRedHousewife@yahoo.com or Like me on Facebook.

Friday, August 19, 2011

Everything Housewives Need To Know About Wine

Here are some quick tips and easy guides to wines and their pairings. My favorite white wine is Pinot Grigio and my favorite red wine is Merlot.

What's your favorite?


Appropriate Wine Temperature

Type Of Wine Fahrenheit
Sparkling 42 to 54
Sherry (Light) 48 to 58
Red 57 to 68
Fortified (Port) 57 to 68
Sherry (Dark) 57 to 68


For red wines, you should remove the cork about an hour before you drink it.

White wines tend to diminish in quality the longer you keep the bottle open at room temperature. Uncork just before you serve to your guests.

If your wine sparkles, pour it down the side of the glass to protect the precious bubbles. If your wine is still, pour it in the center of the glass to let the bouquet permeate the vessel and float upward. Never fill a glass more than two-thirds or even halfway for some. If you plan to sample many wines throughout the course of a meal, serve even less than that per glass.


Tuesday, August 16, 2011

Chile Verde Recipe


Try this slow cooker recipe. It's a great way to cook a filling meal for your family without raising the temperature in your house. Make some homemade tortillas and horchata and your family will think you were imported from Mexico.

Ingredients

  • 4 pounds pork butt or shoulder, trimmed of fat and cut into 2-inch cubes
  • 2 teaspoons salt
  • 1 teaspoon freshly ground black pepper
  • Flour for dredging
  • 1/4 cup vegetable oil
  • 3 yellow onions
  • 2 green bell peppers, cut into 1-inch cubes
  • 2 Anaheim or Poblano chiles, cut into 1-inch cubes
  • 2-3 jalapenos, seeds removed, and finely chopped
  • 3 garlic cloves, peeled and finely chopped
  • 1 1/2 pounds tomatillos, roasted, peeled and chopped
  • 1 tablespoon dried oregano
  • 2 teaspoons ground cumin
  • 2 tablespoons coriander seeds, crushed and soaked in a scant amount of water
  • 2 bay leaves
  • 1 bunch cilantro leaves, cleaned and chopped
  • 4 cups chicken stock

Directions

Season the pork meat generously with salt and pepper, lightly flour. Heat oil in a heavy-bottomed skillet over medium high heat and brown pork chunks well in small batches, on all sides. Lift pork out of pan and place in a wide soup pot. Discard fat and place the onions and peppers in the same skillet and sweat over moderate heat, stirring occasionally until limp, about 5 minutes. Add all of the chiles and cook an additional 3-4 minutes, then add the garlic and cook 1-2 minutes more.

Add the Sauteed vegetables, chopped tomatillos, dried herbs and cilantro to the meat, cover with the chicken stock and bring up to a boil and reduce to a slight simmer. Cook for 2-3 hours uncovered or until the pork is fork tender.

Adjust the seasoning to taste with salt and pepper. Serve with your favorite Mexican cheese.